Project: Makeblock 3D printer
13 July 2014 at 11:33 pm
Note that I took this project really far and it became a great 3D printer. In 2019, I packed it down and here’s why.
Up until now I’ve had two 3D printers. My first one was the Ultimaker Original and it now has more than 4000 hours of printing behind it. An incredibly solid machine! The next printer was the Printerbot Jr that my son put together. I haven’t seen much of it as he’s more or less confiscated it, but it’s been a great investment into making him try out some real engineering.
The Ultimaker Original is probably the best Open Source 3D printer available today. Now I’ve built a third printer from scratch, using the Makeblock aluminium extrusions that I’ve become quite fond of. You can find the build log here, but why did I want to make a new printer?
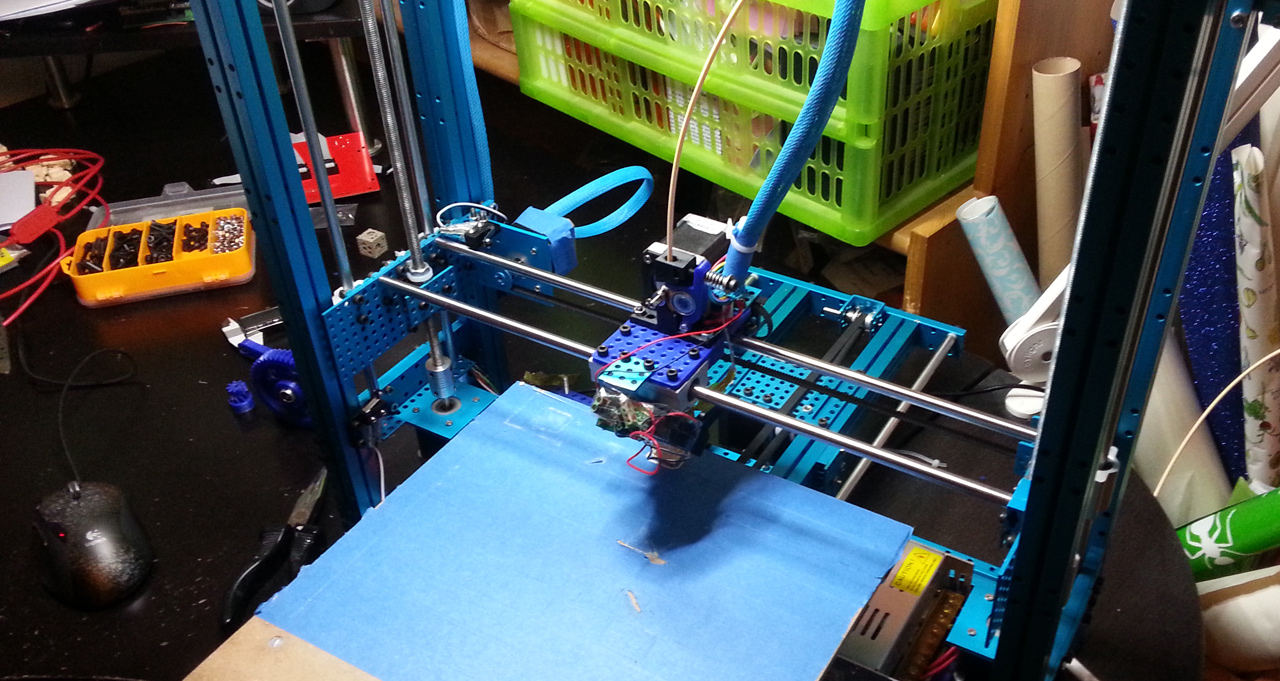
Makeblock advantage
When you are making a printer based on Makeblock it is really easy to adjust the design as you go. It’s also easy to add new elements when you need it. Not only that. When I at some point retire the printer, I can re-use all the Makeblock parts for something else! Makeblock was started as a Kickstarter and they really listen to their customers.
Less hassle!
The single thing that takes the most time for Ultimaker owners is clearing out blockages. They don’t happen if you’re careful, but every now and then you’ll forget turning off the extruder and the heat’ll sneak up the pipe to cause a block. When blocks happen this far up in the extruder, it’ll take 10-15 minutes to clean it out. The new all-metal hotend from e3d & extruder design solves this completely and changing filament is done in a snap. Over all, I’m REALLY happy with this!
Polulu DRV8825 FTW!
I’m using original Polulu DRV8825 stepper drivers. This gives me 1/32 stepping that is noticeably more silent than the typical A4988 drivers with 1/16 stepping. These are also more powerful, but in reality I’m not using that advantage. If you have a noisy printer, be sure to check this video for a comparison. They’re a direct replacement for 4988’s on most Reprap hardware, so odd are they’ll make your printer more silent too.
More space
The new printer has a bigger print area (31 x 31 x 34 cm). This was one of the goals of the printer and I’m very happy that I managed to go even a little bigger than anticipated. For comparison - it’s 32600 cm2 are more than 4 times the volume of the Ultimaker (7700 cm2). It makes levelling the bed a little harder, but it’s totally worth it just to have the ability to print larger objects.
More materials
I’ve changed the design to a Direct Drive Extruder that takes up less space than the original design. This allows a second extruder to be added at a later time. A Direct Drive Extruder it has one major advantage over Bowden-based systems: it supports virtually all the materials I want to experiment with. Flexible plastics, nylon, wood, clay, bronzefill and more. The current setup allows the extruder to go to 300C. With modifications, I can go all the way up to 400C if I want to.
Flexible
Using Makeblock makes the entire design flexible, but the compact extruder design itself is also quite flexible. One addition I’m working on is adding Dual extrusion as in this video. It’s the best approach to dual extruders I’ve seen to date, so expect an update when I get this working! The design allows me to easily swap out the print head fairly easily so I can play around with extruding chocolate and other fun materials.
So - all in all I’m very happy with the printer! All issues are now resolved, so the design phase is complete. Only minor tweaks remain & the BOM is now online at reprap.org. For now the page contains links to resources & the bill of materials, but I’ll also add build instructions to it later.
But - I’ve got more plans! My Ultimaker with 4000 hours of printing on it’s back will soon move to Bitraf and in November I’ll (hopefully) receive my first SLA-printer - the Titan 1!