Custom PCB’s with Fritzing
27 May 2013 at 11:31 am
If you’ve played around with Arduino, you have most probably seen these nice and clean images of circuits that have the Fritzing logo on them? Fritzing is a PCB design program that I really enjoy working with. It’s visual, intuitive and very easy to get started with.
At Bitraf (the hackerspace where I have my office) most of the other electronics geeks have a preference for CadSoft’s EAGLE PCB design software. It’s an impressive program, but it’s also one of the least intuitive pieces of software that I’ve ever used. It’s made by engineers - for engineers. While I have an engineering education, I’m not designing enough electronic circuits to feel comfortable with Eagle.
I’ve now used Fritzing on three different commercial projects and I’m quite sure I’ll use it on many more. Here’s one of my breadboard prototypes, with the finished PCB from Fritzing (the white board) to the left of the breadboard. As you can see, it simplifies the prototype quite a bit:
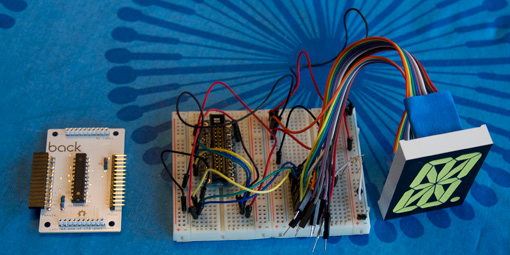
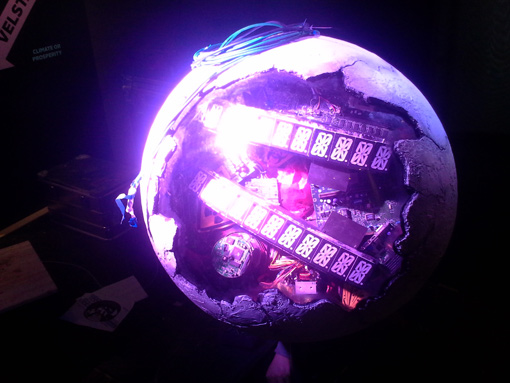
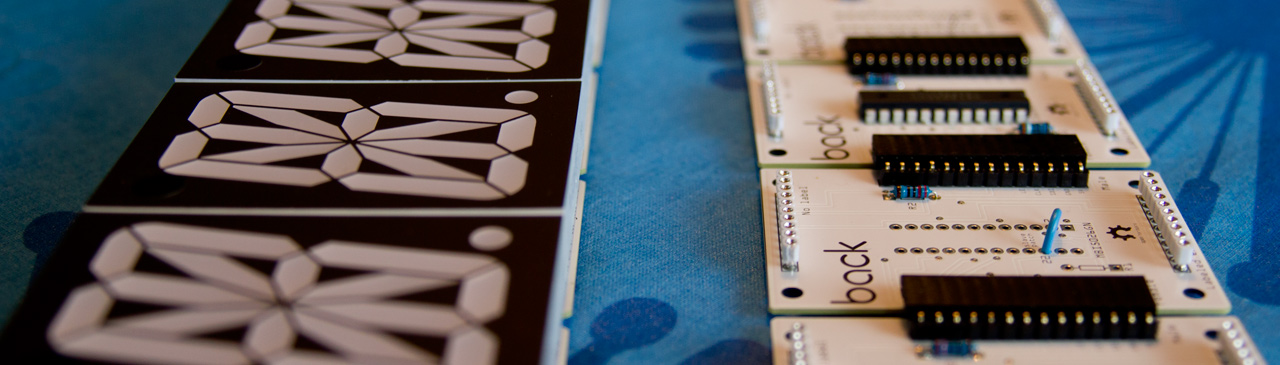
I did this project for my friends at back.no and you can now view the installation at Oljemuseet in Stavanger. The plan was to make a PCB with a LED driver chip that could drive 2.3” segments. We only needed 7-segments, but we loved the colors emitted by these that can be bought from Evil Mad Science. They also had suitable MBI 5026 driver ICs and we love Evil Mad and their work.
The initial plan was to hook up 2 x 12 segments and then use an Arduino to fetch the numbers to display from a web service. The numbers were to constantly show the current number of people on the earth as well as the number of tonnes CO2 released thus far this year. During the project, we switched to using Rasberry Pi’s instead since the Arduino network stack isn’t exactly asynchronus and that made the numbers freeze while fetching updated data. Was great fun to use Python for a project!
How Fritzing is different
As opposed to Eagle and KiCad, Fritzing starts where YOU do - on a breadboard / perfboard. You just place the components in Fritzing, just as they are in your prototype. This breadboard view (step 1 below) is unique to Fritzing and it makes it incredibly easy to make professional looking PCB’s. The next step (2) is to create the schematic. I normally don’t spend time on this unless I need to publish schematics, but I rather move straight on to the third view - the PCB layout (3) like in this example.
This is how the circuit above looks in Fritzing:
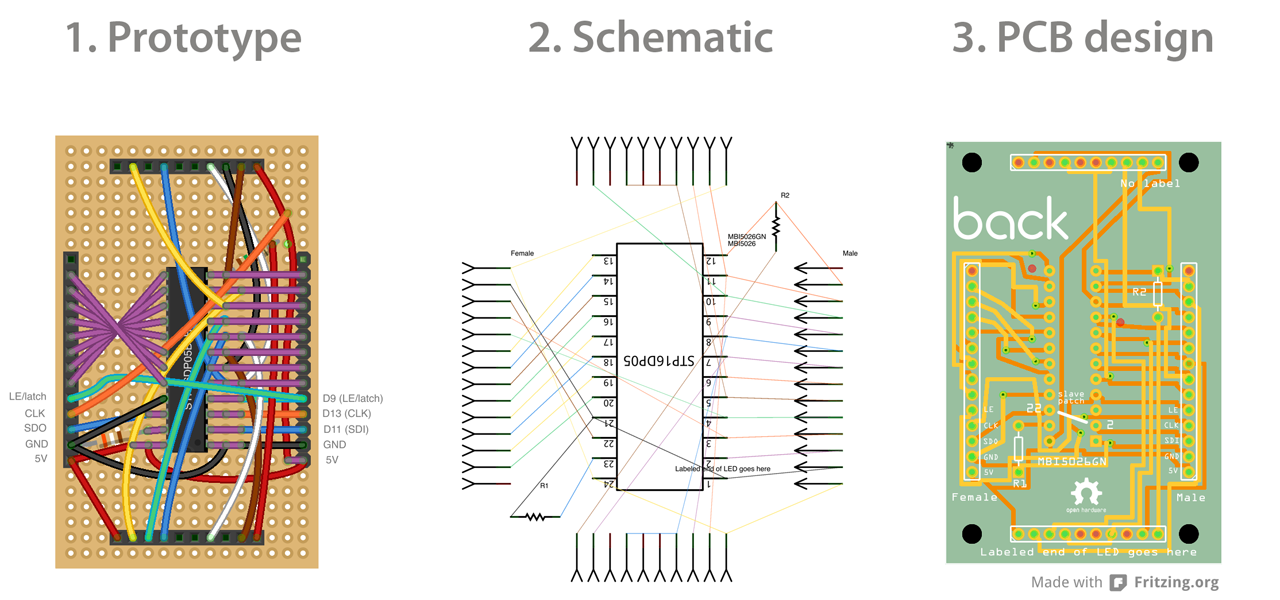
(Click to zoom)
I normally route the PCB by hand and it’s a really swift process compared to how it’s done in other software. Any cable that is connected in the breadboard view (1) must be routed on the PBC (3). If it’s not, you will get errors when you run the “Design Rules Check” (DRC). This ensures that your circuit is electronically sound, but it does of course not compensate for human errors. If you forgot to add a connection in the Breadboard view, it will be missing in the other two views as well.
When you’re happy with the PCB, you can either export to images (great for showing how to connect circuits), the Gerber format RS-274X (for PCB production) or as PNG/PSD for manual etching. You can also export a Bill Of Materials (BOM) so others can see what they need to build your circuit. Very nifty!
Fritzing Fab
The company behind the Fritzing software also offers a PCB creation service called Fritzing Fab. Here you just upload your Fritzing file, set the amount to order, pay and 10-14 days later you’ll receive a white envelope with your own PCBs. These are not the thickest quality available, but they’re solid enough for mounting with screws. They’re two-layer boards in white with a brown/grey silkscreen and you can put pretty much any graphic you want on the designs.
Since the program exports to Gerber, you’re not limited to using the Fritzing Fab service, but if you want high quality and stylish looking PCB’s this is a very good option. It’s not the cheapest PCB service out there, but I absolutely love these white PCBs. You can order just a single PCB to test a design, so there’s no minimum. The more PCB estate you use, the less the price. It’s not shabby at all for German-made quality. Another thing that can be a crucial factor when comparing to other PCB services, is that Fritzing can cut the board to any shape, with any number of via’s and mounting holes for no extra cost. Other low-price services will not even make mounting holes or break up the boards.
Drawbacks of Fritzing
Anyone that have used Eagle or KiCad will say “Fritzing isn’t professional enough” since it looks too simplistic, but that’s just plain wrong. The software is very capable with two key exceptions that may be important to some.
- The Auto-router is just crazy. It can spend forever without finding obvious routes from A to B. If successful, the routes look pretty weird. They’re not something you’d be proud of showing to others.
- While there are a decent set of standard components in the package, there’s many components that are missing when it comes to SMD parts. Apparently it’s quite hard to design new parts, so that limits people from creating more
There’s a couple other minor annoyances as well:
- It closes the entire program if you close the last sketch
- I still haven’t made an etchable PCB that worked well, but I’m sure that’ll improve with time.
For me, Fritzing solves most of my PCB creation, but as soon as I want to use SMD parts, I’ll have to change to Eagle. I do however think it’s a great software to create your first PCBs with. I’ve now placed 4 orders with them and I’m sure I’ll place many more.
Advantages of Fritzing
For a noob making his/her first PCB, Fritzing is ideal.
- Great user interface
- Easy to use
- WYSIWYG breadboarding to PCB is so much better than making schematics
- Constantly updated and improved
- Custom PCB shapes with the Fab service is also a big plus (for me at least)
You can find the Fritzing file attached (Open Hardware licensed). Below is a picure of the final installation of the project that these were used in - mounted inside a big sculpture of the earth.