Project: wifi-enabled RGB LED displays
08 July 2014 at 11:38 am

Every now and then there’s a project you can’t say no to and this was one of them. Finn.no is sort of Norway’s version of Craigslist, a big online market where you can sell just about anything. As a marketing stunt, they opened a physical store downtown Oslo. I was called in via some friends in the agency that handled the project and they needed lots of things quickly. Since I was fully booked, I couldn’t say yes to all the projects suggested so I passed some of them to my friend Thomas Winther who did a great job making an in-store Selfie-app using Unity & LeapMotion.
In the store they needed a way to show information from the finn.no website and this was the job I couldn’t say no to. Apparently it isn’t very easy to get hold of a wifi-enabled LED display that can pull data from the web? Also - most commercially available displays are small, monochrome and use tiny LEDs so they’re not that visible when mounted high up on a wall. The agency wanted 5 large displays, perferably with more than one color display. Having recently read about Teensy 3.1 and the OctoWS library I promptly said I’d do it!
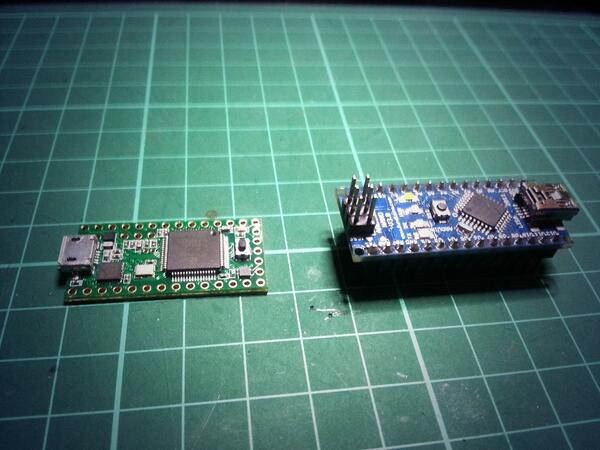
The Teensy microcontroller is a great alternative to using Arduino’s in installations. It has a really fast ARM processor and lots of RAM, but it is still 99% Arduino compatible. This means that pretty much all Arduino code will run on it, but at blazing speeds. After installing a little extra software, you can use the normal Arduino IDE to program it, so it’s really an “Arduino compatible”. It’s so compatible (and affordable @ $20!) that I feel that this is really the path that the Arduino Team should have taken instead of making bigger and more complex boards. Here’s how the Teensy 3.1 looks next to an Arduino Nano. It’s soo tiny that the Nano looks big!
For the parts, I could have saved some money by picking it up from different places, but I didn’t have much time. I picked up tons of Neopixels & Teensy’s from Adafruit since they’d ship the parts so I had them within a week. Buying parts from Adafruit really makes a difference since the whole process is completely trouble free. It’s a little more expensive, but worth every dollar.
This is how the test-display looked when running the rainbow sketch:
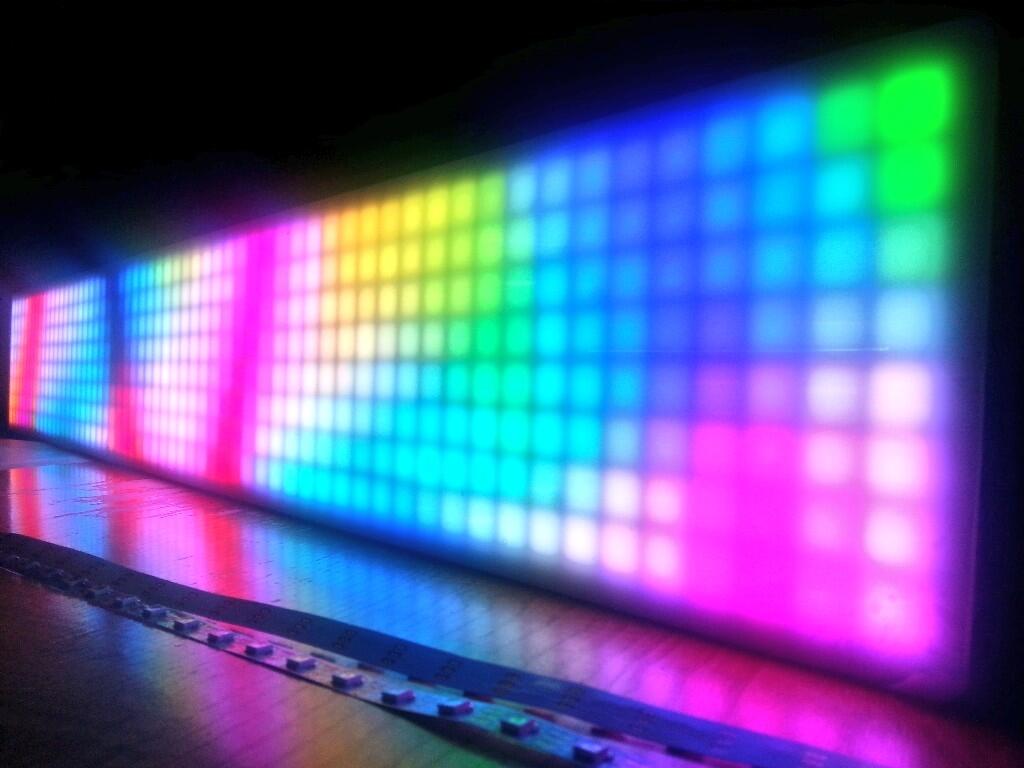
Lovely, isn’t it? You can see the neopixel strips lying in front. I stuck these to the back plate using the same clear silicone that I used to fix the panel to the front. The first test showed that we’d have to compensate a little for every 50cm as the neopixels are put together of 50cm segments and loose a few mm in the overlap between these.
Thanks to Jens Dyvik at Bitraf, making the wooden parts was short. Jens is really good at Rhino and CAM software, so the process from sketch to finished product was really swift. His huge Shopbot CNC’d all the lattices and backplates in one go! Nice to have good tools, right? Two things to note about the CNC’d parts:
- When using MDF as material, make sure each protuding part has a certain minimum size or they’ll break off easily.
- Research carefully what kinds of silicone that will remain fully transparent over time. Most clear silicones will get a yellowish tone over time. The ones that are made for aquariums appear to be the most suited ones.
- When exposed to heat for a long time, MDF will want to “bend”. Make sure you stick it down properly to avoid too much maintenance.
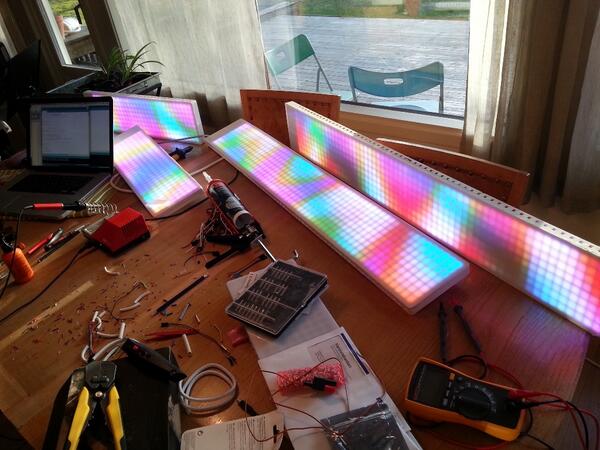
Soldering and gluing together the displays took quite some time, but it was made a lot easier by Paul Stoffergren releasing these neat adapter boards. I added a 2.4Ghz radio to each of these and tucked it away on the back of each display. Here’s a photo showing 1920 pixels running at once. Note that the Mac to the left is on full brightness! The displays are so bright that they’re visible in daylight as well.
Each sign requires quite a bit of cable and with the amount of current going through them, this was the first electronics project I’ve made where I’ve had to calculate the correct diameter of each cable. A good learning experience!
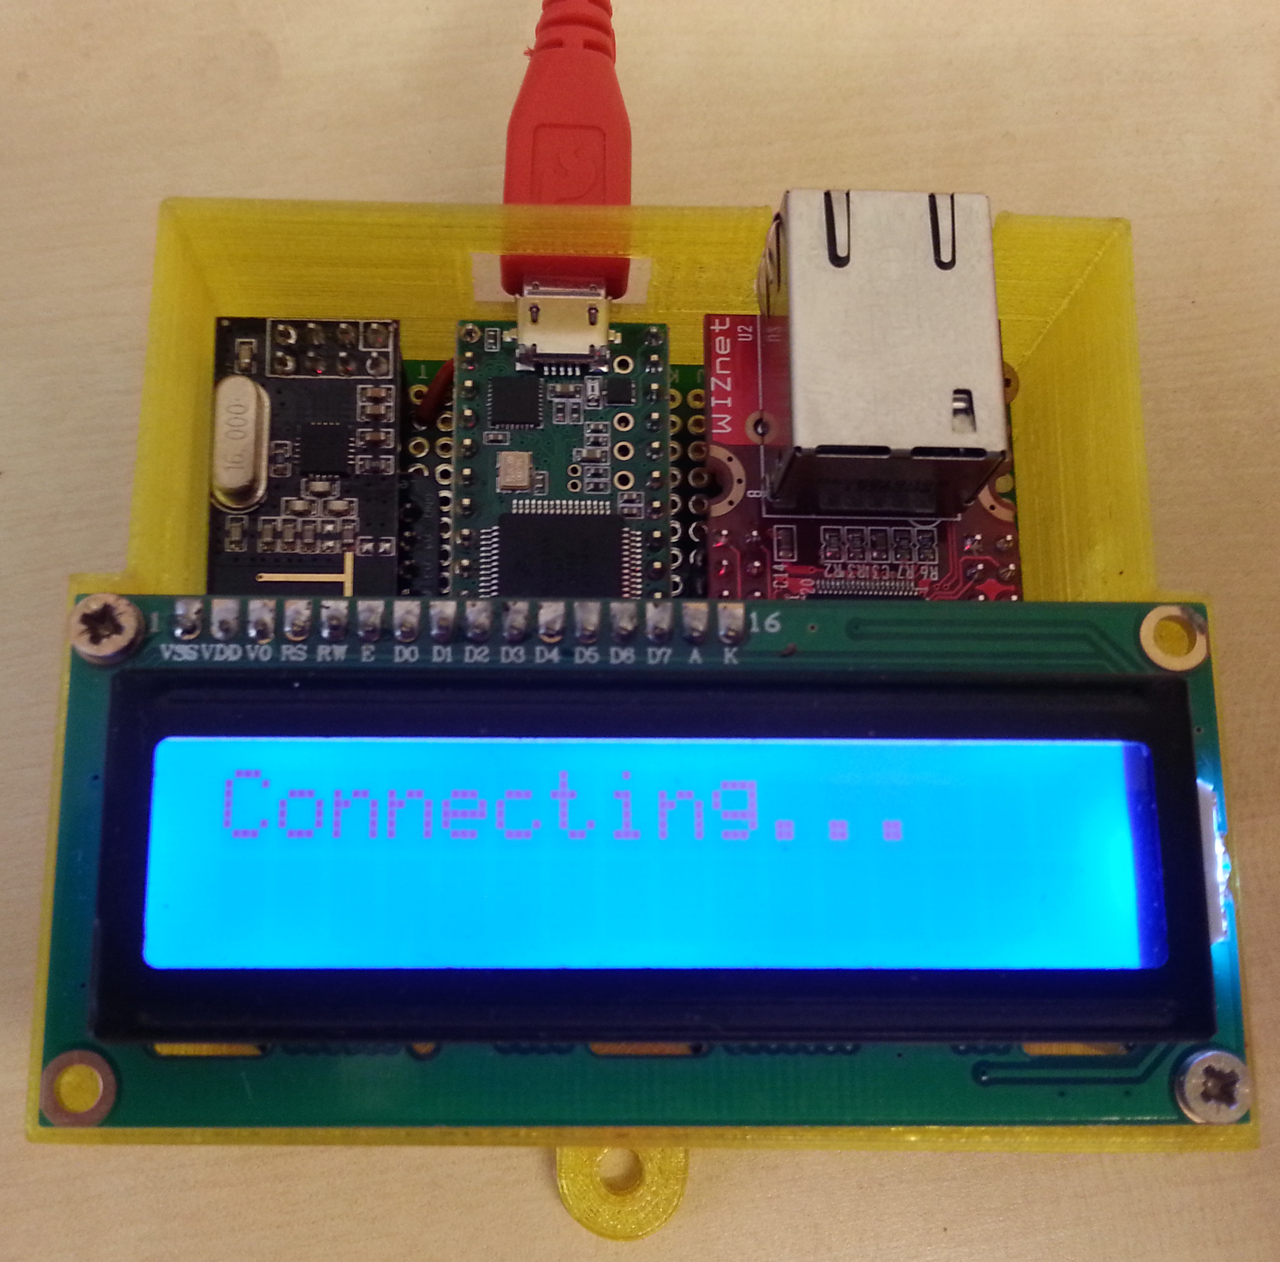
I could have built a Wifi adapter inside each of the displays and in hindsight, that would have been an easier choice if it wasn’t for wifi issues. What I went for instead was a server-client solution where a single box would connect to the internet as well as serve up a webserver that could be used to control all the 5 signs. It has a Teensy 3.1 that holds a custom webserver, uses cable for internet access, has a display that shows status and the IP address of the webserver as well as a nrf24l01 radio (2.4Ghz) that sends data to the signs. This is put together in a nice 3D printed box that is wall mounted.
It’s a pretty versatile solution and it works rather well. There’s two drawbacks to this solution:
- The NRF24L01 radio’s are dirt cheap, but they have a limited range and are affected by other 2.4Ghz radios (bluetooth, wifi & more)
- The Ethernet library for Arduino is a synchronous API. When the device fetches data from the internet, it’ll freeze a short while until the data is received.
None of those issues are big problems, but they’re worth noting if you are building something similar. Initially I planned to use a Raspberry Pi to be the webserver, but it turned out to be really hard to make the NRF24 radios work reliably with GPIO on the Pi. I’ve since noticed that the NRF24 dislikes fast CPUs, so if you’re trying to make this readio work on the Pi, make sure to add a delay to your main loop. The Teensy 3.1 is also too fast for this radio.
The final result is that you can use any device such as your phone to control what is displayed on each of the signs. I’ve also built some remote admin to it as well. Every time the displays power up they’ll await instructions from the server. The server fetches API data such as how many tractors are for sale or what are the latest boats available, and sends this to the displays. It’s super flexible and a true IOT solution.
Disregarding some (serious) mounting issues beyond my control, I really loved solving this project and you can check it out if you’re in Oslo.
Postnote
After making this, my wife said that I should start making and selling these commercially. It’s probably a good idea, but I really can’t see myself selling LED signage. However - if you have some weird project in the Internet of Things domain - feel free to contact me. I love a good challenge!