Makerbotting
24 March 2012 at 11:30 pm
When people ask me what I do these days I tell them that I still make games and apps, but that I play around with microcontrollers and 3D printing. Most people don't really know what 3D printing involves, but I usually have something in my backpack that I've printed. As soon as they get it they say "Ohhh I want one!". But do they really want it?
Lately I've spent quite a bit of time with the Makerbot Thing-o-matic (TOM) that VariousArchitects has in a back room of our office. It's been so much fun and so much to learn that I've spent most of my free time modeling, printing and testing various designs for my LED Cube project. What I've learned up until now is that Makerbots and 3D printers in general require quite a bit of fiddling to keep them in working order. It's a lot of moving parts that are held together with screws and bolts that constantly move. These come loose and the faster your printer moves, the more chance that things will come loose.
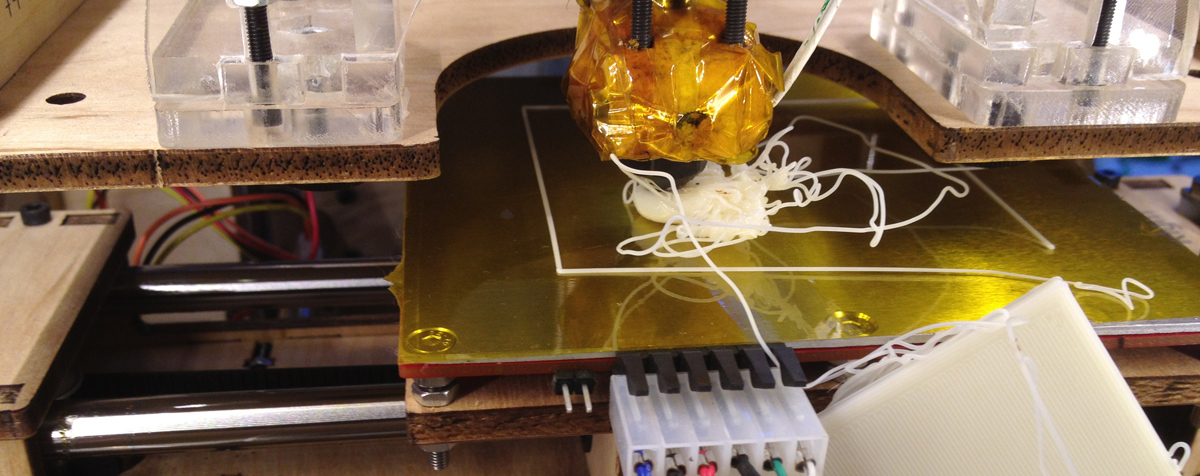
The thing that has caused me the most trouble on the TOM is that my models did not stick the the heated build surface (heated build platform or HBP for short). The model would stick for a couple layers and then one of the corners in the model would loose grip of the platform. The model would bend more and more and in the end it would bend so much that the print head knocked it off. I tried a coulple of the basic tricks like changing the Kapton foil on the build surface but it didn't help much.
My friend Jim at Various was the one that bought the TOM and he suggested that while I was working on the problem, I'd also upgrade and recalibrate it. Sure I thought. How hard could that be? With all my current Arduino experience, the upgrade itself was super easy. Getting the hardware to play nice was harder. After a lot of fiddling, I got everything to work tonight. Yep! I'm in my office in Oslo now at 23 hrs on a Saturday, printing and calibrating. That's how much fun a 3D printer is! Anyway - here's the list of things I did to get the 3mm white ABS filament to play nice:
- The firmware was updated to the latest version for both extruder and main board (an Arduino Mega 2560)
- The HBP was dismounted, every single screw beneath it was tightened and the platform was levelled completely
- I went over every connection inside the bot and sure - the power to the extruder had come loose. It's way to short, so you'll pull it out unless careful
- I also raised the HBP temperature from the recommended 110 to 115 degrees. This makes the builds stick MUCH better.
- ReplicatorG was updated to latest (034) but I'm still using skeinforge 35. For some reason, start.gcode isn't included from the default position so I have to set the HBP temperature directly in the generated gcode. Haven't found a description of this being a bug, so I'll just keep looking tomorrow I guess.
- I failed a lot when it came to the calibration because I didn't properly read the dialogue shown after calibrating: always regenerate your models (both gCode + s3g) completely after recalibrating.
Due to that last one, I had to change the Kapton foil quite a few times after the print head crashing into the platform after a little printing. Think I've spent almost two full workdays fiddling with this now but I finally got a successful print completed now, so time to head home…
But - this is so incredibly fun! So much fun in fact that after some careful consideration I ordered a Ultimaker last week! As opposed ot the Makerbot, this one moves the printer head and not the platform. This solves what I think is the biggest problem with the Makerbot design - if you print too fast, your model will simply fall off the platform. With the Ultimaker this is much less of an issue, just check this video out! That's not the "out-of-the-box" speed though and it comes as a kit.
But when will I get it? Not until 4-6 weeks :(