Project: pressure sensitive floor
28 May 2013 at 1:02 pm
I just came back from the most challenging physical computing project I’ve ever done. It’s a 13 by 8 meter labyrinth where you walk in the dark and get a sensory experience based on more than 300 sensors. The main challenge was actually how much time it took to execute it, but it was such a fun project that I didn’t really mind. You can now try it out yourself at Energisenteret in the theme park Hunderfossen (Troll-themed!) near Lillehammer, Norway. I don’t know for sure, but I think this is the worlds first “pressure sensitive floor”? (video further down)
I’ve worked on several projects with the company SixSides and about a year ago, they asked me if I could build a floor that reacted to the people walking on it. The basic idea was to play back sounds of walking on other surfaces than you really were. Of course I said yes to the challenge!
Researching
My first idea was to make a button-matrix that sensed where you stepped, but after making a quick prototype I realised that this wouldn’t create a very believable experience. Then it dawned on me that it would be MUCH more fun if it was actually pressure sensitive. During this project, I’ve played around with different conductive fabrics and it’s been a blast! I really cannot praise the company PlugAndWear (Texe srl) enough. They’re simply the best source of conductive fabric that I have found and they ship crazy fast from Italy to Norway (2 days!).
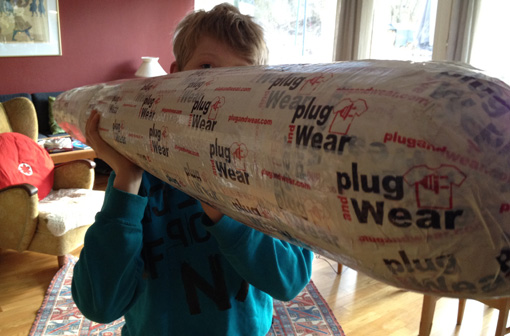
This is how you’ll receive 14 meters of conductive fabric!
One of the many products they have is called Velostat. This material has a very unique property - it’s resistance decrease with pressure. It does so in a way that if you just put a layer of Velostat in between two conductive layers, it will give you about 800 levels of pressure for an adult person stepping on it. If the person weighs more than 90Kg, you will most probably be able to read out the remaining 200 levels using the 10-bit analog inputs of an Arduino.
So I knew that Velostat was a good idea, but I needed a conductive layer both at the bottom and above and one of them should perferably lift up to ensure that there was no contact if pressure was not applied. Copper tape is a really good conductor, so I figured that I could use that as the bottom layer. It is easily taped to the floor and you can solder onto it quite easily. You can get this at multiple locations. I found mine at a shop for artists that make glass paintings.
The upper layer was more difficult. I eventually settled for the fabric called “Doubleface knitted conductive fabric” that has a polyester-thread layer and a stainless steel-thread layer that are knitted together. In my tests, this has stood up to quite a bit of physical abuse so I’m pretty sure it’ll last quite long before being fully compressed. The only drawback of such a fabric is that it’s really hard to work with, given how different these two layers and velostat are. I tried sowing these together, but it was incredibly hard to get the fabric to stay straight.
Prototyping
After settling on Velostat and the knitted fabric, I started prototyping and this is what I ended up with:
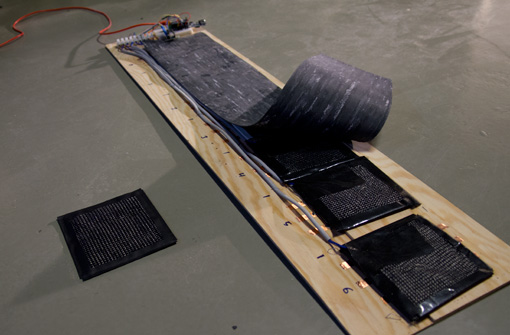
I tried various methods for making the sensors, but the most lasting solution seemed to be using textile tape from Tesa. Just tape together a layer of the knitted fabric ( with the steel side up) onto the Velostat. My only problem was of course that this was a manual job and I needed 300 of them. More about that later.
Above the sensors there were to be a floor of some sort. I did my test using Linoleum, but we ended up using a softer floor covering. I also used Fritzing to make a custom PCB for this (download below). It’s not that it was really required, but it made the installation look professional and simplified the mounting a lot.
Building
Since my prototype was just one of the 7 strips required for a full meter, I really had no idea how much work was required before I started. I ended up spending two full weeks (14 hr days!) on making two 1 by 3 meter floors. This is how the process looked like:
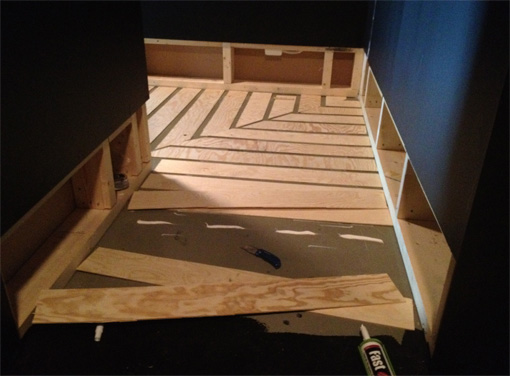
First add 4mm plywood to put the sensors on, making a sort of cable-duct in between them. This ensured that the soft, silicone-covered cables were not too exposed to the constant pressure of people walking on them.
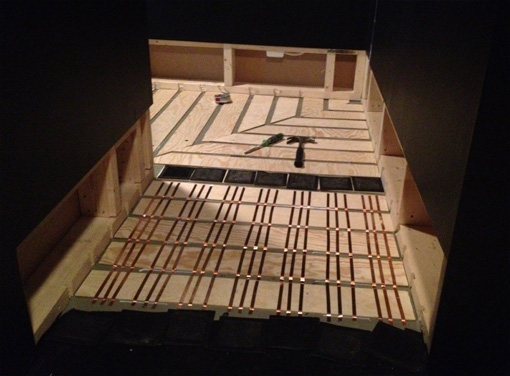
Add the copper tape…
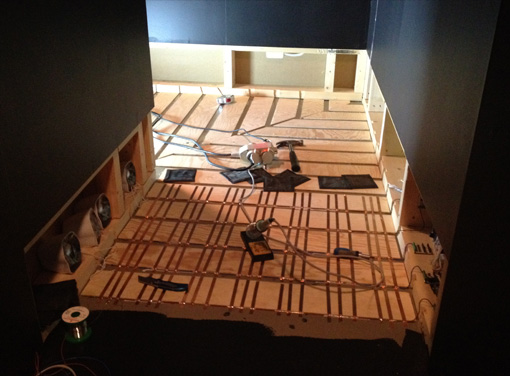
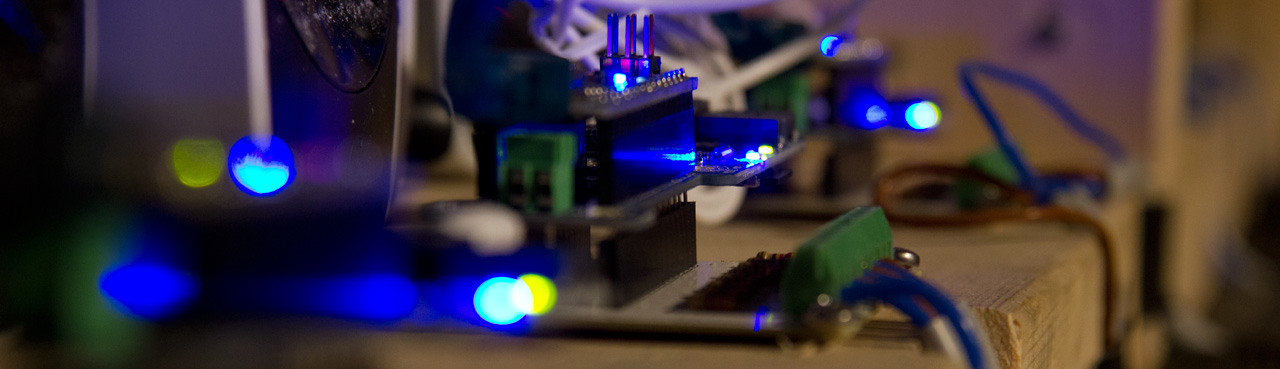
Solder the copper tape to the 5V output of the Arduino Nano’s…
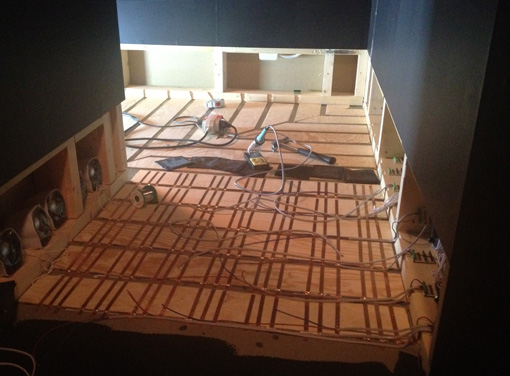
Connect the cables to the analog inputs of the Arduino Nano’s…
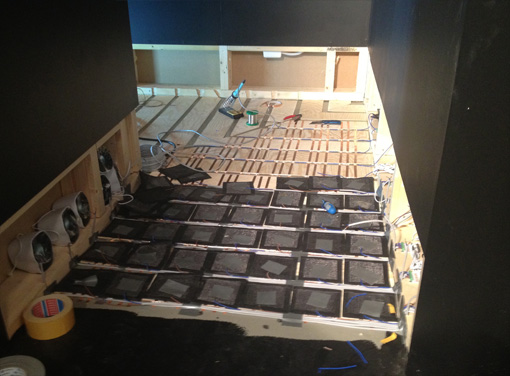
Mount the handmade sensors and secure them to the floor with two-sided tape. Then connect the analog input cables (using the grey tape) and repeat for another meter…
After this has been done to the entire floor, I put sounds on the SD cards, programmed the Arduino’s with their sound-cards and mounted them along with some suitable speakers.

Result
I’m really happy with the result! The finished floor is so sensitive that I can sense a soda-bottle cap falling onto it! The sound playback happens the instance you put pressure on the floor and it really seems like you’re walking on ice or other things. Selecting the correct sounds is of course a difficulty, but it’s easy to adjust this. It’s just files on a SD card after all.
I’ve also written the software so that wear’n’tear on the sensors won’t affect how the installation work. They don’t use the real pressure-level, but rather changes in an averaged level. If a floor tile becomes fully compressed so it no longer produces level changes, you can just rip it up and tape down another, so maintenance is easy.
The floor consists of 40 strips of 15 cm width, each with an Arduino Nano measuring up to 8 sensors. The complete installation is using 55 Arduino Nano’s as well as sound cards from Gravitech. I opted for these since they’re small and thus easy to mount. They’re also very easy to get replacements for if that should be required.
Lessons learned
During the project I’ve learned a few things:
- I now know that I should have used a much wider copper tape rather than three separate ones. Each one of these needs a soldered joint. Having just one rather than three, would have saved me 600 solder points and it would have been just as good.
- Another thing I’ve learned in the project is that building a small prototype really does not cut it. You need to build a bigger prototype to correctly estimate the amount of work required. In the end I spent about 16 hours on each meter of pressure sensitive floor. My estimate was just a third of this, so since this was a fixed price project I didn’t exactly become rich. If I do a similar project, I’ll definitely insist on hourly pay or get somebody else to do the actual construction of the floor.
- I’m using .OGG formatted files. MP3 files will add a few milliseconds of silence at the start of the sound and in this case, it ruined the experience. The OGG format does not have this problem.
- The next time I design electronics that require multiple similar resistors, I’ll definitely look into using a resistor-network instead.
- Plan ahead for the carpentry and expect lot’s of adjustments as the project progress…
- Making the pressure sensor tiles took forever… Help is required if you do something like this, so a big thank you to Liv @ Sixsides for helping me out!
- As soon as the walls are closed, it’s a lot more work to get cables to the right spot, so make cable ducts that are wider than expected.
- Arduino’s are really solid for use in installations, but poor quality USB cables will affect both sound and stability.
Despite taking a long time, this has been a fantastic project! I really loved to do the whole thing from concept, research and realisation. It’s so many other things one could use such a floor for, so I can easily see people building similar things as inputs for games and music. It also involved lots of other sensors (touch + distance + movement), but I’ll do a separate post on those at a later time.
If anyone is interested in such a floor, I also have several ideas for how to simplify and industrialise the production of such floors, so feel free to contact me 😊