RadSense 1 launch, lessons learned, new tools
20 August 2024 at 8:47 pm

Today I've officially launched my first product - the RadSense 1. I've written up a press release, prepared graphics, tutorials and more. And woudn't you know - I even got my first sale through Amazon in addition to the 15 units sold directly?
As I've written about before, it really does take time to prepare things for a product launch. The product itself is just a tiny bit of it. I've spent free time over the last year to make and test the device. One of the trials have been in an outdoor (but covered) environment and the device has had no issues apart from the occasional vandalism. The device has been working as intended through a freezing January (-20C) and hot summer days with the solar rays baking it (+50C), so it seems to be solid.
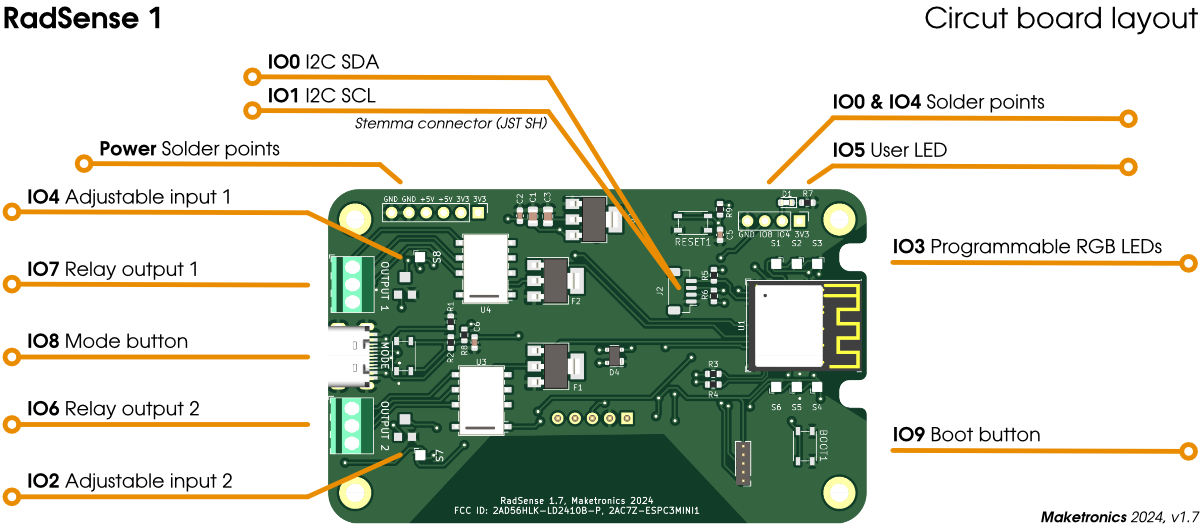
As part of the launch I've prepared a tutorial on how to change the firmware using the Arduino IDE, made sure all features on the website works, created a nice looking Pinout diagram, schematics and tomorrow I'll finish a couple more tutorials on how to hook up things to be controlled using the device. I've also made the current source code available for anyone to hack and improve. Here's a link to the press release, so feel free to write mention it where it may be appropriate?
I also have plans to write articles on how to use it to report presence using IoT services, to count visitors and many other things. I also have a nice Use Case lined up from a museeum in Stavanger. If you have suggestions for how to market the product, message me! I have some ideas, but I'm very open to more!
Letting a product evolve
Despite the device being quite simple, it's surprising how ideas have to marinate over time. The current iteration on sale at Amazon.com is version 1.6. I have version 1.7 laid out, but not yet produced. The main cause for the new version is a hardware bug in the ESP32 C3 chip. Due to this bug, one cannot easily use ADC2 - connected to IO pin 5. Unfortunately, I'm using that exact pin for analog readings. I've not seen any issues in the product due to this, but Espressif insist that it shoud not be used (to the point of preventing it). So that means that I have to swap some pins even though the problem does not affect my product.

The other change is that the LED indicators for the relays will be changed to RGB LEDs, so they also can fully turn off when the user sets the device in “No LED” mode. I don't understand how I could develop for such a long time and not instantly think that was smart? The C3 bug was also discovered a year ago, but it took a long time for it to actually reach the SDKs so I only noticed some weeks after the first batch was sent off for sale… The problem will only surface for those that want to hack the device, so it's cheaper for me just to swap v1.6 PCBs to anyone needing it than pulling the products from Amazon and sending them back.
Live and learn - to always check the Errata before shipping a product I guess?
New graphics tools
As part of the process, I also took the time to learn Afinity Designer 2. I've used Adobe tools for maybe 20 years, but now was the time to look at the competition. For the cost of just above one month with the Adobe CS package, I now have full licences for vector drawing, pixel manipulation and publishing. For both Mac, iPad and Windows! I much prefer this traditional way of buying and owning software vs the Adobe rental model.
Switching over from Illustrator and Photoshop has been a breeze and both tools solves several annoyances I've had with the Adobe tools over the years. Affinity's software is simply more intuitive. It's not that I don't have to look things up, but when I think something should be working by doing X, it usually does. Quite happy with the Pinout image I made and I'll make much more in the days to come.
