Testing Capacitive soil moisture sensors
28 October 2019 at 5:33 pm
After this summers testing of the HiGrow board, I felt a need to look at alternatives. The HiGrow board has a lot of issues that could easily be solved by not insisting on using an integrated solution. Why not just use a separate sensor?
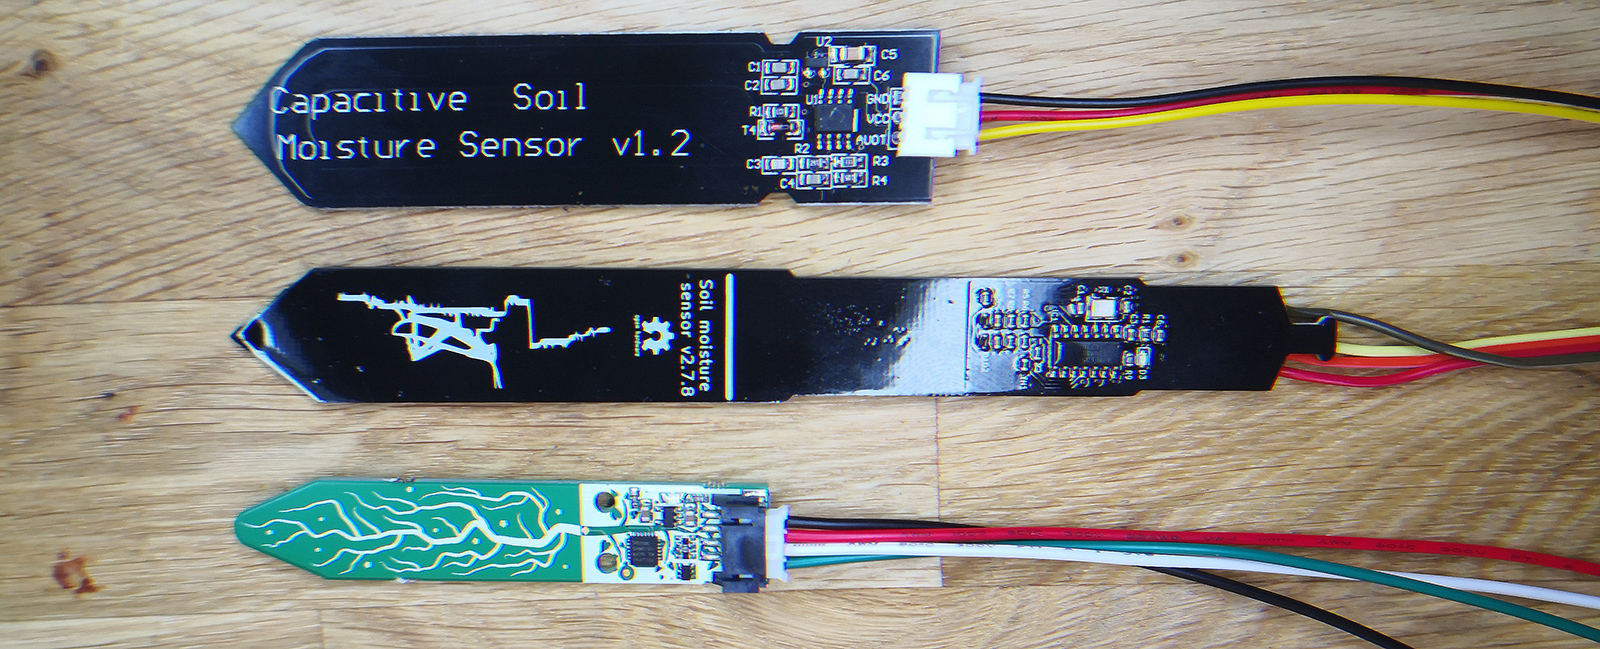
Here I’m testing 3 alternative sensors:
- Generic Capacitive Soil Moisture Sensor (Analog)
- Adafruit’s Stemma soil sensor (I2C)
- Catnip Electronic’s Soil moisture sensor (I2C)
If you are wondering why I’m not including the dirt cheap soil sensors you can get for less than a dollar on Ebay or other sites, check this great video by Andreas Spiess that will explain why these will not work for anything other than simple tests. There’s a lot of other posts on why these only last a few weeks.
Generic Capacitive Soil Moisture Sensor from Banggood
This sensor is basically the Capacitive sensor found in the HiGrow boards. It has an analog interface and supports 3-5V operating voltage, so you can use it with pretty much any normal Microcontroller that offers analog inputs. It’s dirt cheap at $5, but I have also found it for as low as $2 at times. It’s very hard to beat this in terms of price and it performs very similar to the HiGrow boards.
In soil it is slow to adjust to a change in moisture, but if you put it in a glass of water, the result will be surprising. It takes almost 20 seconds to get to reach a stable value when put in water. There’s more details on this sensor in my HiGrow post, but this sensor basically solves capacitive measurements without all the hassle of the incorrectly designed HiGrow boards.
Adafruit Stemma soil sensor (SeeSaw)
I love Adafruit hardware. If you’re pressed on time to get a prototype up and running, it’s always worth the cost to use components from them. The fact that a library also existed for Particle Photon is a testament to Adafruit’s high quality. They always ship devices with good, working code and great examples that get you going quickly.
This sensor is I2C based and supports up to 4 different addresses (0x36, 0x37, 0x38 & 0x39). For this test, I purchased 3 units. I just followed the online instructions https://learn.adafruit.com/adafruit-stemma-soil-sensor-i2c-capacitive-moisture-sensor?view=all , changed their I2C addresses with a blob of solder and I was ready to go. I made a small code snippet for a Particle Photon that could read all 3 sensors in sequence and just print the results to Serial.
Here is a sample reading of the sensors while just hanging in ambient air. As can be seen, the 3 sensors pretty much agree on both temperature and capacitance:
1: Temperature: 25*C Capacitive: 330
2: Temperature: 24*C Capacitive: 346
3: Temperature: 25*C Capacitive: 333
1: Temperature: 25*C Capacitive: 330
2: Temperature: 24*C Capacitive: 346
3: Temperature: 25*C Capacitive: 334
1: Temperature: 25*C Capacitive: 331
2: Temperature: 24*C Capacitive: 346
3: Temperature: 25*C Capacitive: 334
1: Temperature: 25*C Capacitive: 330
2: Temperature: 24*C Capacitive: 346
3: Temperature: 25*C Capacitive: 334
Compared to the Higrow board, these readings all seem very consistent. If I dip all 3 sensors in water, they all read out a value of 1017. Testing in various types of soil shows that very dry soil produces values of 700-800. Dry sand produces values of about 400. If your plant ever got to these levels, it would be dead by long. If the soil is only slightly moist, this sensor will max out. Even if just the tip of the sensor touches moist soil, it’s maxed out. This makes the sensor pretty much useless and that is a shame as it seems very well built?
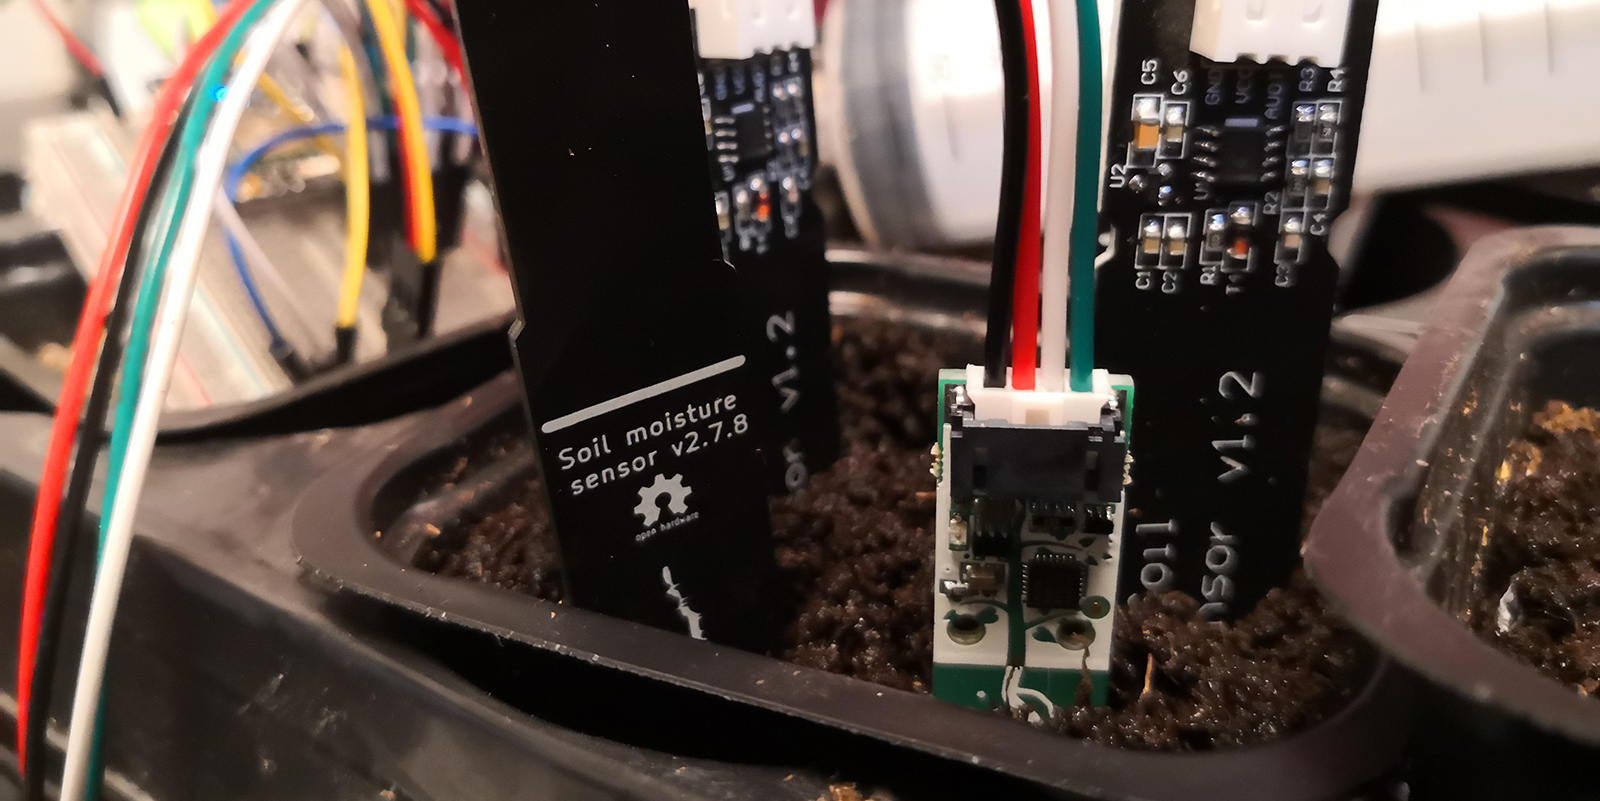
My testbed is a setup of several small planters with either sand or a mix of soil and mulch. All three of the SeeSaw Soil Sensors work exactly the same, so I’m sure that I’m not measuring them incorrectly. Just touching wet soil with the tip of these sensors will produce a max value and that’s not how the other sensors work. I’m actually suspecting a production error as I refuse to believe that Adafruit would ship something as imprecise as this?
Update: Troubleshooting the Stemma Sensor
To try to solve this problem, I took two of the boards and covered them with clearcoat spray in the hopes that it would reduce the signal & prevent saturation. Most forms of conformal coating is just a simple spray lacquer with good dielectric properties. Most clear coat sprays will work for this purpose. My first first test using 3 coats showed only a very limited attenuation, so I tried applying 6 coats (total). This produced a slightly better dampening, producing an attenuation of about 90.
After a lot of testing, I randomly stumbled upon the answer to why the Adafruit Stemma sensors do not work: they are affected by the other sensors! Measuring the Stemma alone works well and it’s more linear, but using it with any of the other sensors in the same flower bed will produce saturated readings? Other Stemma sensors in the same planter will also produce the same error. Neither of the other two sensors has this problem, so I can only assume this is a bug not caught before production? Just touching the moist soil with any of the other two sensors will produce incorrect results for the Stemma sensor.
I have made 2 brief videos showing this problem:
Stemma with the other two sensors
Catnip I2C moisture sensor
This sensor is made by Catnip Electronics in Lithuania and purchased via their Tindie store https://www.tindie.com/products/miceuz/i2c-soil-moisture-sensor/ If you do no know Tindie - it stands for Technology-INDIE and is a site where small scale shops can sell electronics they have made. It’s not meant for reselling other people’s stuff. It’s basically a platform that helps makers share & sell their creations without setting up your own store.
Catnip Electronics is know in the community for the Chirp plant watering alarm https://wemakethings.net/chirp/ and the sensor I’ve gotten from them is the I2C-version of the Chirp (without battery & sound). They also offer a Modbus RS485 version of this sensor, but for my purpose the I2C version is the best suited. They also offer the devices with a conformal coating to make them more rugged. I’m not sure if this is anything more than a clear coat, but that’s also often all you need (so that’s why I’m trying it on the Adafruit Stemma). Given that it’s based on a battery operated device, this device also offers excellent Power saving features.
The simpler sensors can only measure moisture, but this one as a few more tricks and can measure Temperature and Light as well. The light sensor is quite sensitive and seems to have a useful range, though it maxes out long before detecting direct sunlight. It will certainly tell you if it’s cloudy or not, so it’s a great little addition. Another useful feature is that you can change the I2C address to be any of the legal 127 possible combinations. For larger installations, this really comes in handy.
The main drawback of this sensor over the others is its price. At $13 per unit, it is almost twice the price of the Adafruit Stemma soil sensor. If you want the Rugged version that is coated in epoxy, has a glue lined heatsink and a pre-soldered 1m wire, you’ll pay $22 per unit. If you are on a budget, this is a drawback since you could get 11 of the cheap analog sensors at this price. If you’re from a high-cost country (like I am), this option is a massive advantage. If you get paid $100 per hour, this is not a high price to pay to get something that is complete and solid. They also offer volume pricing.
Feature comparison
The three boards come with different features and in this case, it really reflects what you get. The dirt cheap Analog sensor from Banggood and similar, can only do capacitive measurements. The Adafruit sensor adds a temperature sensor, while the Catnip sensor adds a light sensor as well as the possibility to do Deep Sleep
|
|
Analog |
Catnip |
Adafruit |
| Capacitive sensor |
V |
V |
V |
| Temperature |
X |
V |
V |
| Light sensor |
X |
V |
X |
| Deep sleep |
X *) |
V |
X *) |
| Price |
$5 |
$13 |
$7.50 |
Example measurements
All measurements are done over time, so we’re not just listing the first result but rather the value that the sensor has settled on after about a minute in the medium. Except fo the last step (soaked), about 25ml of water was added to the planter. The sensors were removed, the soil was mixed around for more even distribution of moisture and the sensor were re-inserted. The process was repeated twice and the average was plotted.
The most notable difference is that the analog sensor works the opposite of the other two sensors (that has internal processing). I’m assuming the Catnip and Adafruit sensors read in a similar value and then compute the result that is then output via I2C. One thing to notice is how quickly the Adafruit sensor reaches maximum sensor value, both alone and with other sensors nearby. It puzzles me that this isn’t better calibrated?
|
|
Analog |
Catnip |
Adafruit w/others |
Adafruit alone |
| In air |
386 |
190 |
322 |
322 |
| Dry |
357 |
213 |
768 |
350 |
| Slight wet |
472 |
240 |
1016 |
560 |
| Moist |
737 |
245 |
1017 |
667 |
| Very moist |
768 |
363 |
1017 |
660 |
| Soaked |
897 |
456 |
1017 |
644 |
The numbers become even clearer when you plot them in a graph. Here you can clearly see how much faster the Stemma sensor reaches saturation, even when it’s in it’s own pot.
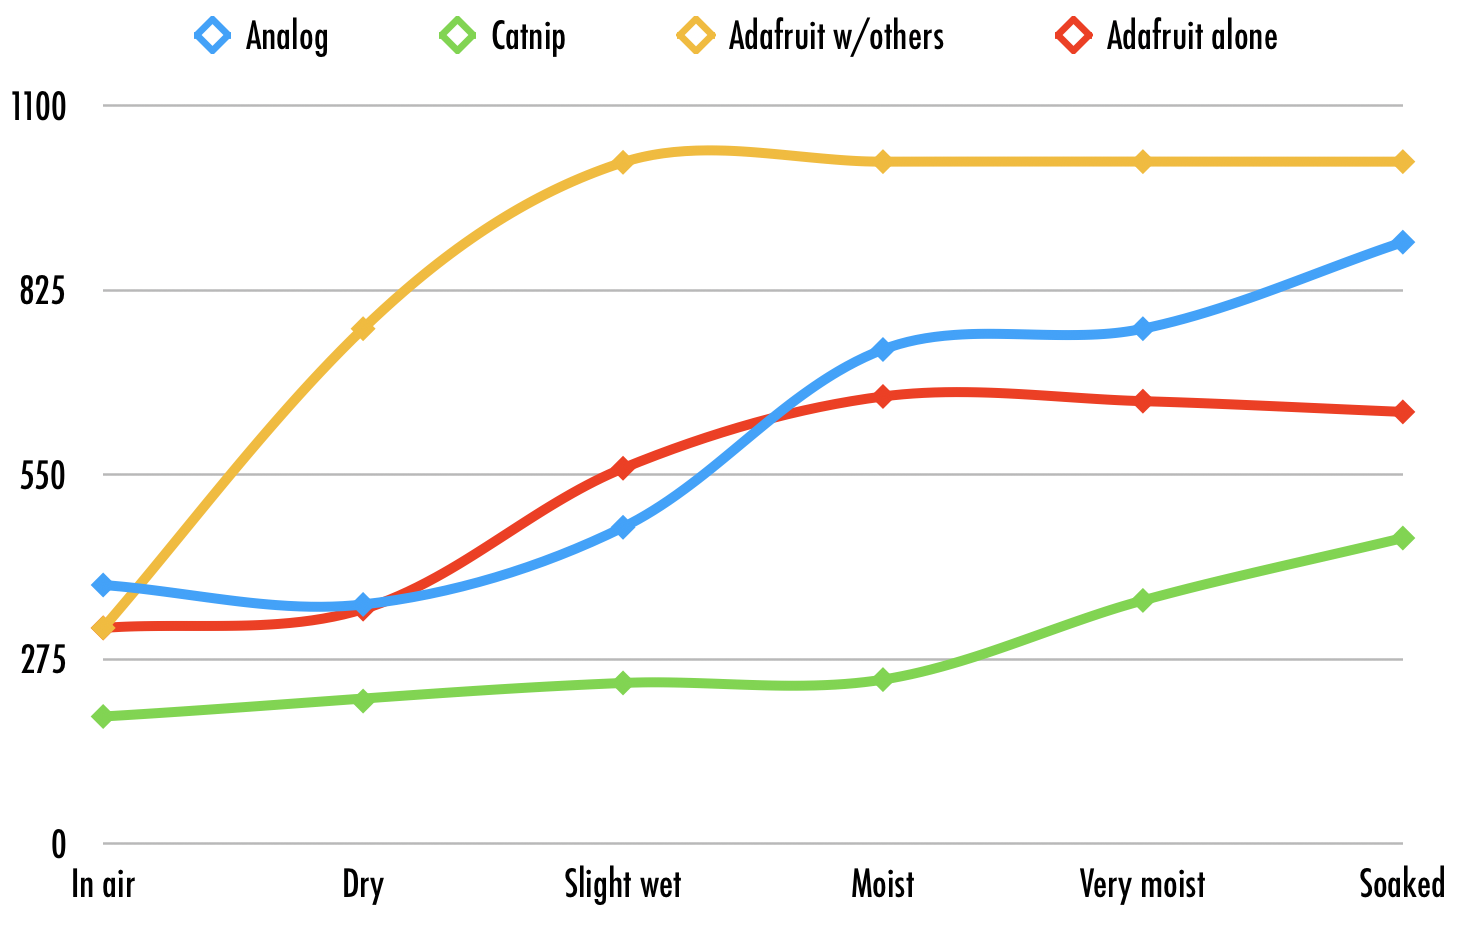
It’s important to point out that it is impossible to get a 100% comparable result, but this will give you a good overview of typical measurements. As you can see, the bump on the “moist” level is likely me applying a little too much water in both the tests.
Summary
Overall, I’m very impressed with the sensor from Catnip Electronics. No library is required to use it, just a few lines of code that are very easy to integrate into any project. The measurements of this sensor seem to be much more linear than the other two and the results are very consistent. If money is not a problem, this is certainly the sensor I would use for my projects.
The Adafruit sensor offers temperature in addition to soil moisture, but the fact that it is saturated long before you get enough moisture into the soil, I cannot recommend it. The worst is that using more than one Stemma sensors will knock all the others out, so you basically cannot use more that one if you choose the Adafruit Stemma? As mentioned above, it puzzles me that it’s not been tested better as the problem with interference from other sensors is likely to be noticed by anyone trying to use this for more than a single plant with a single sensor.
If you’re on a budget, it’s hard not to select the analog sensor and rather just spend some time getting the results right. It should be fairly simple to get these to produce an accurate image of how moist the soil is. Just be careful not to add too much water too quickly as it takes a little more time then the other two to settle when going from dry to moist.