Solving PlatformIO issues with the Adafruit Feather S3
22 January 2023 at 6:25 pm
Using the ESP32-S3 with the Arduino IDE works really well. You just Select the correct port and board type and it all works. It does not auto-reset the board though, so after each upload we have to press the Reset button. This tiny issue will probably be fixed in new updates If you’re using the PlatformIO IDE, it’s not as smooth and this is how you solve the issues.
I'm posting this to help my students troubleshoot errors on our devices, but it may also be useful for others using the Adafruit Feather ESP32-S2 with no PSRAM and other variants.
Using the S3 with PlatformIO
With PlatformIO, there’s several things we have to do for the S3 to program successfully. Below is the default platformio.ini if you are using an ESP32 S3 with Platformio. With this alone, it’s impossible to program the device.
[env:adafruit_feather_esp32s3_nopsram]
platform = espressif32
board = adafruit_feather_esp32s3_nopsram
framework = arduino
Solving the 6.0.0 error
Let’s start with an error that is specific to the 6.0.0 version of the espressif32 platform. Right now as this is written (Jan 2023), it has a bug that creates this error output:
Source `partitions-4MB-tinyuf2.csv’ not found, needed by target `.pio/build/adafruit_feather_esp32s3_nopsram/partitions.bin’.
For some reason, the file used by ESP32 S2 is suggested for S3. This is fixed in later versions. For now, we can work around this by either locking the version of the espressif32 platform to version 5.3.0 or to specify the correct partitions like this:
board_build.partitions = partitions-8MB-tinyuf2.csv
If you add that to the platformio.ini, the error will go away and you can then program the device, but only once? Why is that?
Using the correct USB mode
Most devices are factory preprogrammed with a nice animation for the RGB LED and some other things as part of the testing. This will make the first flashing work and then it’ll fail on all subsequent tries for a really frustrating experience.
One of the very cool features of the builtin USB on the S3 is that the device can work as a USB Host device. The problem with this is that it works as Host by default. If your device only has a single USB port that is used for uploading and debugging, you will likely have this error:
fatal error occurred: Could not open /dev/cu.usbmodem14101, the port doesn’t exist
 *** [upload] Error 2
You could also get an error like this one if it fails a little later:
Forcing reset using 1200bps open/close on port /dev/cu.usbmodem14101
Waiting for the new upload port…
Error: Couldn’t find a board on the selected port. Check that you have the correct port selected. If it is correct, try pressing the board’s reset button after initiating the upload.
 *** [upload] Explicit exit, status 1
This just means that the device isn’t being programmed in the correct way and yet again we can solve the problem by adding to the platformio.ini file:
build_flags = -DARDUINO_USB_MODE=1
This will tell the board to use the USB to program the device. After adding this and programming the board once using the Button sequence described below, it’ll program the device every time without error. This will work until the device is flashed without this flag - at which point you'll have to repeat this sequence again.
Note that this fix applies to all boards based on the ESP32-S3 chip, with the exception of boards that have two USB ports. For these, the trick above won’t work.
Troubleshooting other issues
When programming the ESP32 S3, there will be times when something prevents the device from being programmed. In some cases, this is a device problem and other times it may be that the user has uploaded code that simply makes the device crash on startup.
For this, we have a fail-safe solution and that is to set the device into "firmware download mode". This is done by pressing and keep holding the BOOT button down, while pressing and releasing the RESET button once and then release the BOOT button. In some cases this sequence must be done twice.
When uploading, you’ll see an output like below scroll across the terminal output. It’s exactly when PlatformIO is waiting for a new port that you should press these buttons. Note that the XXX in cu.usbmodemXXX below will be a number on Unix/Mac. On windows, this will say COM3 or something like that:
Looking for upload port…
Auto-detected: /dev/cu.usbmodemXXX
Forcing reset using 1200bps open/close on port /dev/cu.usbmodemXXX
Waiting for the new upload port…
If the upload fails after the second of the above 4 lines, you should do the BOOT/RESET trick both here and when it gets to the last line (“Waiting for the new upload port…”). If it does progress by itself beyond line 2, there is no need to press a button until it reaches the fourth line. Once you’ve done this trick once, the device should program nicely every time unless there still is a code-related problem.
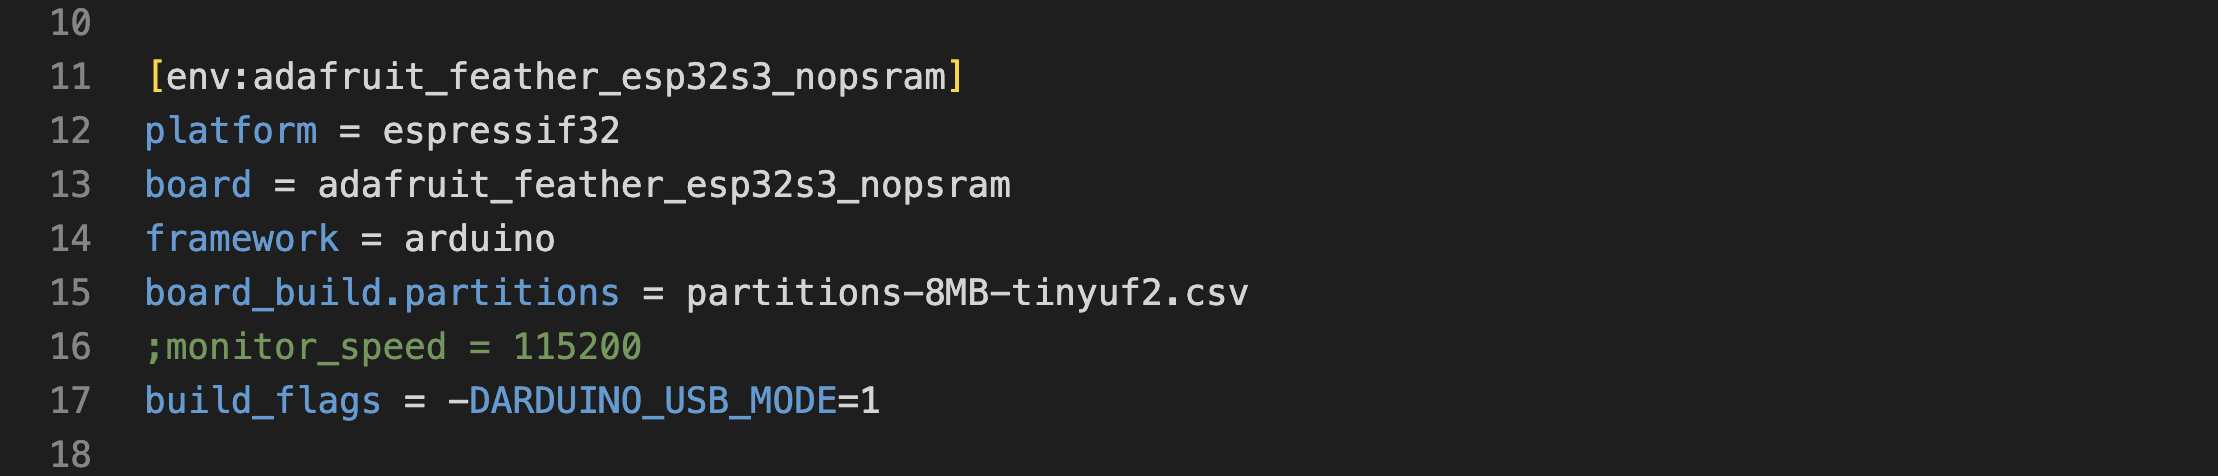
A complete and well working platformio.ini for the Adafruit Feather ESP32 S3 (for the variant without PSRAM) can be found below.
[env:adafruit_feather_esp32s3_nopsram]
platform = espressif32
board = adafruit_feather_esp32s3_nopsram
framework = arduino
board_build.partitions = partitions-8MB-tinyuf2.csv
build_flags = -DARDUINO_USB_MODE=1
Make sure to keep any library dependencies and other custom instructions (if you have that in the files already), but do not duplicate lines.
Making Serial work
If you have a problem getting the Serial Monitor to work after uploading, there are a couple things you can do. The first is to give the Serial Monitor a little more time by waiting 3-5 seconds before producing Serial output. This can be done with just a simple delay like this:
delay(5000); // Wait 5 seconds
If that does not help, you can press the RESET button once. This should show a message in the Serial Monitor like this:
Disconnected (read failed: [Errno 6] Device not configured)
Reconnecting to /dev/cu.usbmodem14101 . Connected!
The device should then reconnect and be able to produce the Serial output. On some Windows machines, an alternate solution is to click once into the Terminal window where the Serial output should be and press CTRL+C. In some cases, this forces a disconnect + reconnect.
One final trick is to preset the speed of the Serial connection in platformio.ini with this line:
monitor_speed = 115200
The speed here should match the speed you have already set in your code with the Serial.begin command. If you do not have this problem, don't add this line.
Errors during upload
If things compile fine, but fail during the final upload step (where it starts counting % finished uploading), there is another common error. If you have another window open (such as another VS Code window) with the Serial Monitor open, or you have a software such as VMWare that tries to grab your Serial port - these can both prevent you from programming the device correctly. When you start programming a device, it turns off the Serial output and other windows will try to "capture" it again if they loose connection. So look around and make sure there is no other software open that is using the same Serial Port. It can only be used by one device at once.
Note: As mentioned initially, the Arduino IDE solves these issues already and if you are reading this post 6 months after it's release, it's very likely that all these issues have been solved in PlatformIO also. This is just the pain of using a chip that was released recently and the tooling not following along.